
Building
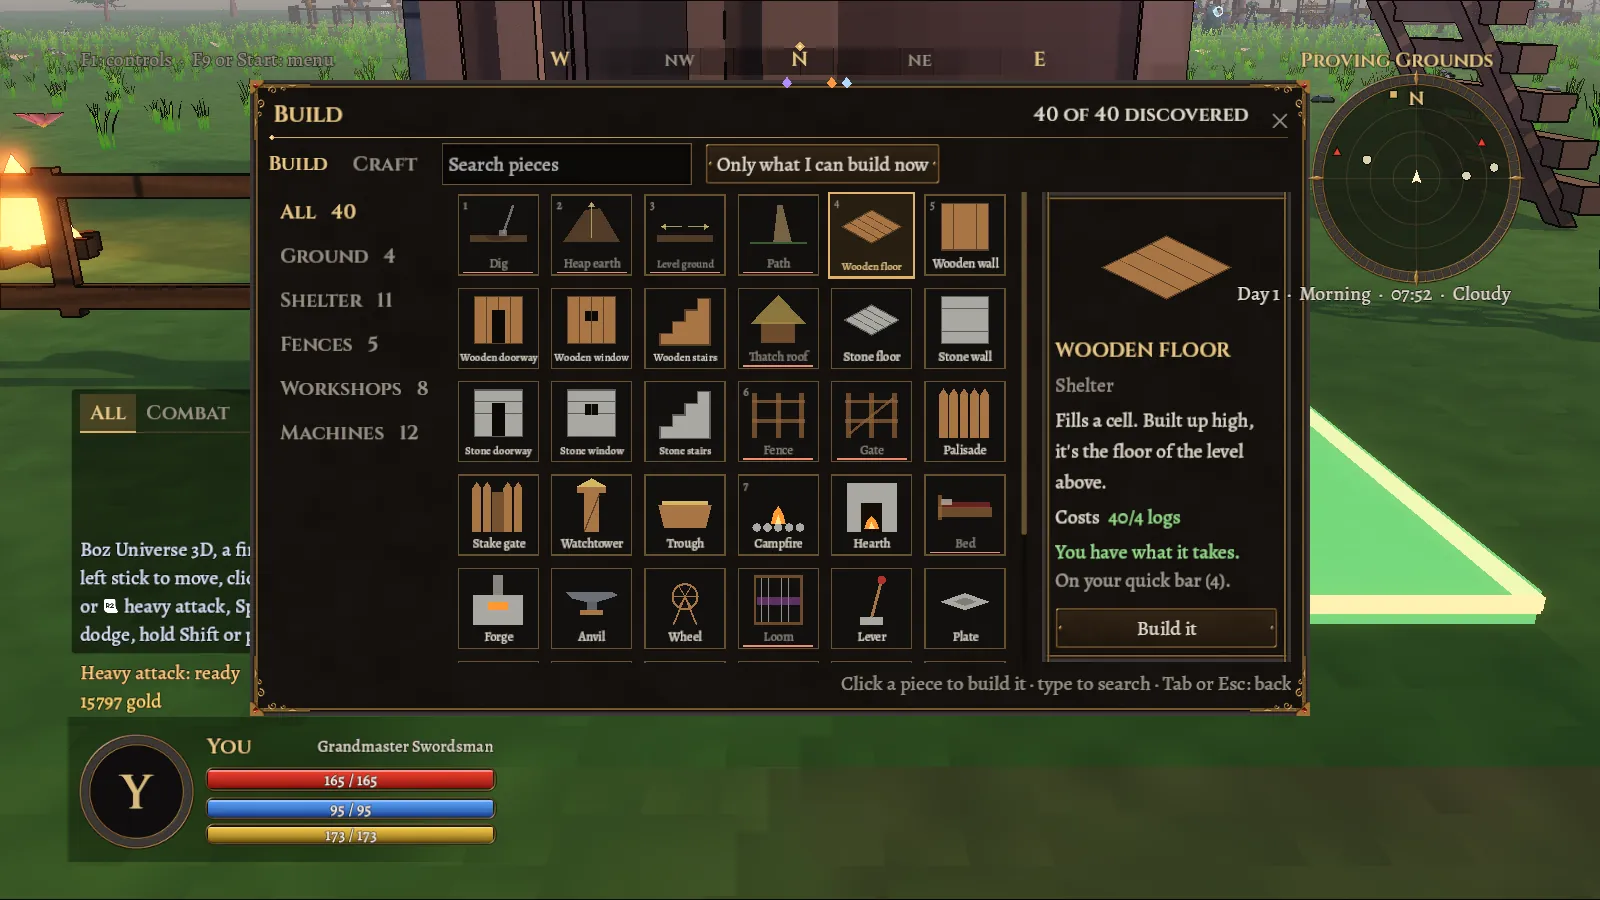
Press B and you are in build mode, looking through your own eyes. A ghost of the chosen piece shows where it will go: green when it fits, red when it doesn't, with a short line saying why.
The grid
Pieces snap to a grid of 2-metre cells, in levels about as tall as a room. Floors fill a cell, walls and fences stand on its edge, stairs climb one level, roofs cap it, and stations and machines sit in it. You can build up to six levels high, as long as there is something below to hold each piece up.
Placing a piece takes its cost from your backpack. Taking it down gives half back. Everything you build is saved.
Keys and buttons
| Action | Mouse and keyboard | Controller (PS5) |
|---|---|---|
| Enter or leave build mode | B (Esc or C also leave) | L1 + d-pad up; ○ leaves |
| Place the piece | Left click | ✕ |
| Take a piece down | Right click or G | □ |
| Next or last piece on the quick bar | Mouse wheel, Q / E, or 1 to 8 | d-pad left / right |
| Turn the piece | R | R1 |
| Level up or down | Page Up / Page Down | d-pad up / down |
| Build menu (every piece you know) | Tab | R3 |
| Change style | T | △ |
Rooms and lines in one go
Hold the click and let go at the far corner (on a controller, hold ✕ and walk). Floors and roofs fill the rectangle; walls and fences run along the line, and dragged corner to corner they make the walls of a room. One drag places up to 64 pieces, each shown green where it fits and red where it doesn’t, and the log tells you how many were built and why any were not. Stations, lights and stairs still go one at a time.
Discovering pieces
You start with a wooden floor, a wooden wall, a fence, a campfire, and the ground tools. Every other piece is discovered by doing something, and a card tells you when a new one is yours. A few examples:
- Build a wall, and you work out a doorway. Build three, and a window.
- Four floors teach you stairs; four walls, a thatch roof.
- Carry eight stone, and you can build in stone.
- Hold any ore, and you can build a forge. A forge leads to an anvil.
- A campfire leads to a hearth, a hearth to a bed and a palisade.
A new piece goes onto your quick bar of eight while there is room. The build menu holds them all, with search and a tick box for "Only what I can build now".
What things cost, and how strong they are
| Piece | Cost | Strength against raiders |
|---|---|---|
| Wooden floor or wall | 4 logs | Wall: 120 |
| Stone floor or wall | 8 stone | Wall: 400 |
| Fence | 4 sticks, 2 plant fibre | 40 |
| Thatch roof | 4 sticks, 6 plant fibre | · |
| Palisade | · | 200 |
| Watchtower | · | 260 |
| Hearth | 10 logs, 12 stone, 4 sticks | · |
| Forge | 20 stone, 4 logs | · |
A battered piece can be mended for a third of its cost: stand beside it and press G. Mending trains Carpentry.
Styles
Every people's land has its own look. Build a wall in Norse land and it is dark, cold pine; the same wall in Egyptian land is warm and pale. Press T to lock a style, so everything you place uses it wherever you stand. You can use the land's own style, the plain camp style, or the style of any people whose land is in your world. Styles change only the look, never what a piece does.
Each people's own set of building shapes, beyond colours. Coming
Shaping the ground
The ground is yours to change. In the Ground group of the build menu:
- Dig lowers the ground where you aim, and gives you earth.
- Heap earth raises it.
- Level ground flattens an area to the height of the spot you aim at.
- Path packs the earth into a pale trail you walk a fifth faster on.
Moving water
Fill a bucket at a lake or pond and pour it into a hole you have dug: it fills from the bottom up, and past the rim it runs downhill into the next dip. A ditch dug at a lake's edge fills from the lake and never runs dry. Dig under a pond and it sinks; heap earth under it and it rises or spills. Ponds you make stay where you made them.
Blueprints
At a drafting table, with a blank blueprint, you can draw a building you have made: every piece joined to the one you aim at goes onto the plan. Later, anywhere, build it again from the blueprint in your backpack. A ghost of the whole plan shows where it goes and turns a quarter at a time, and placing it builds it at once from your materials. Pieces you had not learned you learn from it, and you keep the blueprint. Drawing needs some Carpentry, more for bigger plans.
Hamlet elders sell their people's plans, such as a Norse longhouse or a Turkic yurt, and any vendor or elder buys blueprints back, the ones you drew too.
Where you can't build
Not on top of something already built, inside the Proving Grounds camp, right at the world's edge, in water, on a steep slope, up high with nothing to hold the piece up, or in a village's land unless its founder lets you.